


Mixer tab
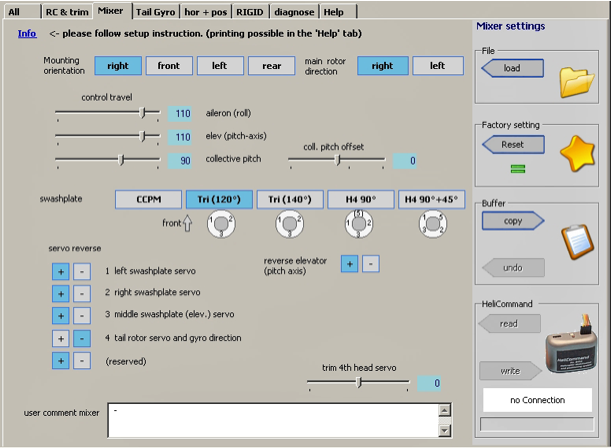


The set up is mainly defined from this page. This "info" describes the various steps. They are detailed in the section "Set Up" of this tutorial.

Main rotor direction : Needed to define the corrections to be applied to the internal tail gyro when the "torque compensation" option is used. Seen from the top, a clockwise rotation is "right"; an anti-clockwise rotation is "left".

Mounting orientation : Click on the button corresponding to the actual fitting on the heli. The button turns blue. (See "Modules" in the section Installation" of this tutorial).

Servo reverse : Reverses the direction of each individual servo. It will apply to commands coming from the radio and from Helicommand.


Maximum travel of the channel: Adjusts the ATV of the corresponding channel. This setting must be the same for the commands coming from the radio and from Helicommand. That adjustment must be made here and not on the radio.


Collective pitch neutral: Adjusts the neutral position (pitch 0°) and therefore ensures the symmetry of pitch Max/Min independently of the max value.


Type of the swashplate: Choose the type existing physically on the heli.


Reverse elevator: Reverses the direction on the nick channel. It will be applied on commands coming from the radio and from Helicommand. Normally, this reversion is only necessary when the nick servo is mounted at the front of the head rather than, as usual, at the back.


Trim 4th servo : Used only if the head is a H4 type. Used to eliminate parasitic mechanical effects.